• Opiniões
    • Arte
    • Dízimo
    • Tecnologia e Aprendizado
    • Guerras
    • Orkut
  • Setups
    • Meu Setup – Hardware
    • Meu Setup – iMac
    • Meu Setup – iPhone
  • Sobre

Oraculum Blog

android

Android: Como acessar o banco SQLite no Android Virtual Device – AVD

21 de April de 2014 by oraculum Leave a Comment

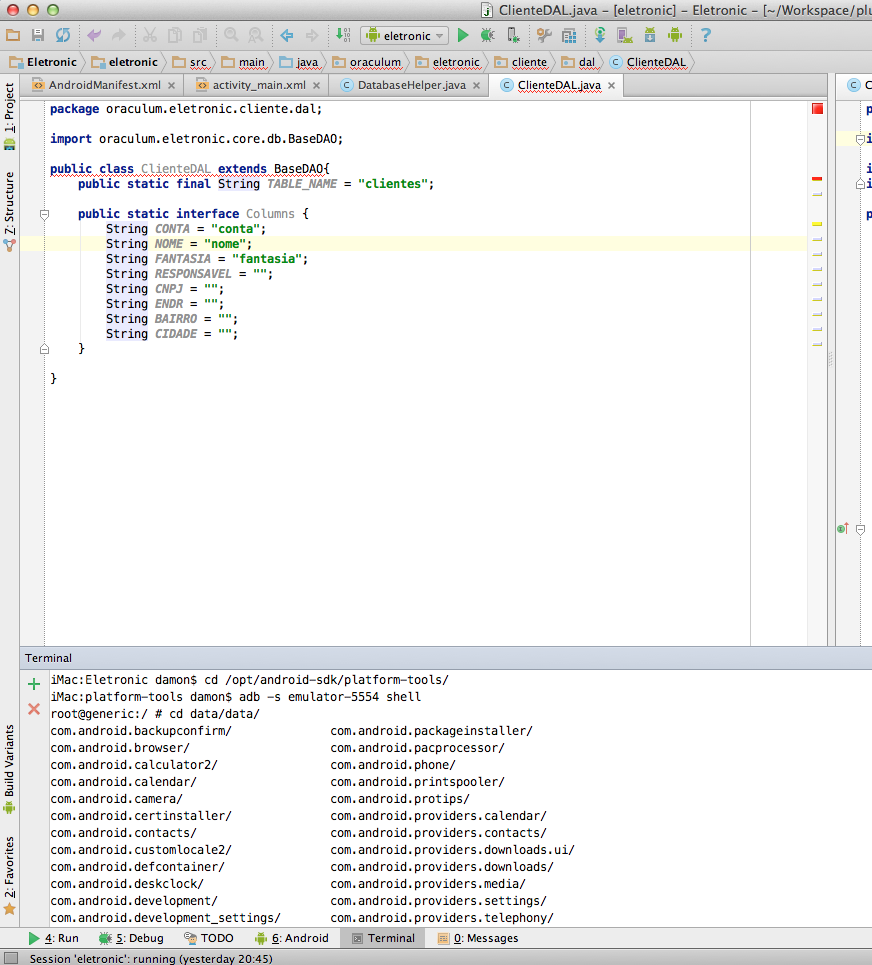
Veja como acessar o banco de dados sqlite da sua aplicação dentro do emulador Android Virtual Device – AVD,  você pode acessar os comando diretamente no Terminal do seu MAC / Linux ou usando o Terminal do Android Studio:

1 – Vá no local de instalação do SDK Manager, geralmente é algo como:

cd /opt/android-sdk/plataform-tools/

2 – Digite o seguinte comando para visualizar o os devices instalados

adb devices
ele deve retornar algo como
emulator-xxxx device

3 – Connecte no device

adb –s emulator-xxxx shell

4 - Navegue até a pasta onde está o banco de dados

cd data/data/<seu-package-name>/databases

5 – Conecte no banco

sqlite3 <sua-db-nome>.db

6 – Rode os comando que precisar

Select * from table1 where …. ;

Dentro do shell os comando são semelhantes ao do terminal unix, ou seja funciona o “ls” “touch” etc…

Posted in: Tecnologia Tagged: android

Mostrar e ocultar teclado no Android via código

18 de August de 2012 by oraculum 5 Comments

Veja abaixo como ocultar ou mostrar o teclado do android programaticamente.

MOSTRANDO O TECLADO

OCULTANDO O TECLADO

Posted in: Tecnologia Tagged: android

Enviar comandos para o Virtual Device do Android

15 de April de 2012 by oraculum Leave a Comment

Se você quiser saber como trabalhar com GPS no android veja esse artigo pode lhe ajudar um pouco.

Se estiver usando linux ou mac existe uma outra maneira de enviar comandos de GeoLocation ou Chamadas para a Android Virtual Device:

1 – Posicione-se na pasta onde está instalado o seu SDK no meu caso é em:

/opt/android-sdk/platform-tools

2 – Dentro da pasta faça: ./adb devices
ele irá retornar algo como
List of devices attached
emulator-5554 device

3 – O passo 1 e 2 são opcionais para pegar a porta que o Virtual Device está escutando. Agora vamos conectar via Telnet no emulador: telnet localhost 5554

4 – Agora é só você rodar os comandos que precisar:

# colocar bateria no máximo
power status full
power status charging
# fazer uma chamada para o emulador
gsm call 012041293123
# enviar um sms para o emulador
sms send 12345 Will be home soon
# set a localização do gps do emulador
geo fix 48 51
Posted in: Diversos Tagged: android

Android: EditText aumentar linhas e alinhar ao top

2 de April de 2012 by oraculum Leave a Comment

Veja como aumentar o número de linhas de um EditText fazendo-o ficar como uma TextArea de HTML:

Posted in: Tecnologia Tagged: android, edittext

Mascara de CPF para campos EditText no Android

29 de February de 2012 by oraculum 14 Comments
droid

Veja como fazer essa mascara ###.###.###-## no seu EditText


Veja a parte do código como fica:

1
2
3
4
5
6
7
8
9
10
11
12
13
14
15
16
17
18
19
20
21
22
23
24
25
26
27
28
29
30
31
32
33
34
35
36
37
38
39
40
41
42
43
44
45
46
47
48
49
50
51
52
53
54
55
56
57
58
59
60
61
62
63
64
65
66
67
68
69
70
71
72
73
74
75
76
77
78
79
80
81
82
83
84
85
86
87
88
89
90
91
92
93
94
95
96
97
98
99
100
101
102
103
104
105
106
107
108
109
110
111
112
113
114
115
116
117
118
119
120
121
122
123
124
125
126
127
128
129
130
131
132
133
134
135
package lethus.socialdroid.core.widgets;
 
import android.content.Context;
import android.text.Editable;
import android.text.InputType;
import android.text.TextWatcher;
import android.text.method.NumberKeyListener;
import android.util.AttributeSet;
import android.widget.EditText;
 
public class CpfEditText extends EditText {
	private boolean isUpdating;
 
	/*
	 * Maps the cursor position from phone number to masked number... 12345678912
	 * => xxx.xxx.xxx-xx
	 */
	private int positioning[] = { 0, 1, 2, 3, 5, 6, 7, 9, 10, 11, 13, 14 };
 
	public CpfEditText(Context context, AttributeSet attrs, int defStyle) {
		super(context, attrs, defStyle);
		initialize();
 
	}
 
	public CpfEditText(Context context, AttributeSet attrs) {
		super(context, attrs);
		initialize();
 
	}
 
	public CpfEditText(Context context) {
		super(context);
		initialize();
 
	}
 
	public String getCleanText() {
		String text = CpfEditText.this.getText().toString();
 
		text.replaceAll("[^0-9]*", "");
		return text;
 
	}
 
	private void initialize() {
 
		final int maxNumberLength = 11;
		this.setKeyListener(keylistenerNumber);
 
		this.setText("     -   ");
		this.setSelection(1);
 
		this.addTextChangedListener(new TextWatcher() {
			public void afterTextChanged(Editable s) {
				String current = s.toString();
 
				/*
				 * Ok, here is the trick... calling setText below will recurse
				 * to this function, so we set a flag that we are actually
				 * updating the text, so we don't need to reprocess it...
				 */
				if (isUpdating) {
					isUpdating = false;
					return;
 
				}
 
				/* Strip any non numeric digit from the String... */
				String number = current.replaceAll("[^0-9]*", "");
				if (number.length() > 11)
					number = number.substring(0, 11);
				int length = number.length();
 
				/* Pad the number to 10 characters... */
				String paddedNumber = padNumber(number, maxNumberLength);
 
				/* Split phone number into parts... */
				String part1 = paddedNumber.substring(0, 3);
				String part2 = paddedNumber.substring(3, 6);
				String part3 = paddedNumber.substring(6, 9);
				String part4 = paddedNumber.substring(9, 11);
 
				/* build the masked phone number... */
				String cpf = part1 + "." + part2 + "." + part3 + "-" + part4;
 
				/*
				 * Set the update flag, so the recurring call to
				 * afterTextChanged won't do nothing...
				 */
				isUpdating = true;
				CpfEditText.this.setText(cpf);
 
				CpfEditText.this.setSelection(positioning[length]);
 
			}
 
			public void beforeTextChanged(CharSequence s, int start, int count,
					int after) {
 
			}
 
			public void onTextChanged(CharSequence s, int start, int before,
					int count) {
 
			}
		});
	}
 
	protected String padNumber(String number, int maxLength) {
		String padded = new String(number);
		for (int i = 0; i < maxLength - number.length(); i++)
			padded += " ";
		return padded;
 
	}
 
	private final KeylistenerNumber keylistenerNumber = new KeylistenerNumber();
 
	private class KeylistenerNumber extends NumberKeyListener {
 
		public int getInputType() {
			return InputType.TYPE_CLASS_NUMBER
					| InputType.TYPE_TEXT_FLAG_NO_SUGGESTIONS;
 
		}
 
		@Override
		protected char[] getAcceptedChars() {
			return new char[] { '0', '1', '2', '3', '4', '5', '6', '7', '8',
					'9' };
 
		}
	}
}

package lethus.socialdroid.core.widgets; import android.content.Context; import android.text.Editable; import android.text.InputType; import android.text.TextWatcher; import android.text.method.NumberKeyListener; import android.util.AttributeSet; import android.widget.EditText; public class CpfEditText extends EditText { private boolean isUpdating; /* * Maps the cursor position from phone number to masked number... 12345678912 * => xxx.xxx.xxx-xx */ private int positioning[] = { 0, 1, 2, 3, 5, 6, 7, 9, 10, 11, 13, 14 }; public CpfEditText(Context context, AttributeSet attrs, int defStyle) { super(context, attrs, defStyle); initialize(); } public CpfEditText(Context context, AttributeSet attrs) { super(context, attrs); initialize(); } public CpfEditText(Context context) { super(context); initialize(); } public String getCleanText() { String text = CpfEditText.this.getText().toString(); text.replaceAll("[^0-9]*", ""); return text; } private void initialize() { final int maxNumberLength = 11; this.setKeyListener(keylistenerNumber); this.setText(" - "); this.setSelection(1); this.addTextChangedListener(new TextWatcher() { public void afterTextChanged(Editable s) { String current = s.toString(); /* * Ok, here is the trick... calling setText below will recurse * to this function, so we set a flag that we are actually * updating the text, so we don't need to reprocess it... */ if (isUpdating) { isUpdating = false; return; } /* Strip any non numeric digit from the String... */ String number = current.replaceAll("[^0-9]*", ""); if (number.length() > 11) number = number.substring(0, 11); int length = number.length(); /* Pad the number to 10 characters... */ String paddedNumber = padNumber(number, maxNumberLength); /* Split phone number into parts... */ String part1 = paddedNumber.substring(0, 3); String part2 = paddedNumber.substring(3, 6); String part3 = paddedNumber.substring(6, 9); String part4 = paddedNumber.substring(9, 11); /* build the masked phone number... */ String cpf = part1 + "." + part2 + "." + part3 + "-" + part4; /* * Set the update flag, so the recurring call to * afterTextChanged won't do nothing... */ isUpdating = true; CpfEditText.this.setText(cpf); CpfEditText.this.setSelection(positioning[length]); } public void beforeTextChanged(CharSequence s, int start, int count, int after) { } public void onTextChanged(CharSequence s, int start, int before, int count) { } }); } protected String padNumber(String number, int maxLength) { String padded = new String(number); for (int i = 0; i < maxLength - number.length(); i++) padded += " "; return padded; } private final KeylistenerNumber keylistenerNumber = new KeylistenerNumber(); private class KeylistenerNumber extends NumberKeyListener { public int getInputType() { return InputType.TYPE_CLASS_NUMBER | InputType.TYPE_TEXT_FLAG_NO_SUGGESTIONS; } @Override protected char[] getAcceptedChars() { return new char[] { '0', '1', '2', '3', '4', '5', '6', '7', '8', '9' }; } } }


Veja a parte do XML como fica:

1
<lethus.socialdroid.core.widgets.CpfEditText android:id="@+id/txtCpf" android:layout_width="match_parent" android:layout_height="wrap_content" android:inputType="number" />

<lethus.socialdroid.core.widgets.CpfEditText android:id="@+id/txtCpf" android:layout_width="match_parent" android:layout_height="wrap_content" android:inputType="number" />


Mais informações sobre como implementar essa mascara consulte o artigo da mascara de telefone

Posted in: Tecnologia Tagged: android, cpf, edittext, mascara

Como descompactar arquivo .gz no Android

27 de February de 2012 by oraculum Leave a Comment

Você pode precisar carregar alguns arquivos na sua APP como por exemplo uma lista de todas as cidades e estados do brasil ou um banco com os ceps para isso você pode manter esses arquivos compactados em um arquivo .gz para não pessar muito na hora da instalação e dentro do projeto, daí na hora de fazer a instalação você  descompacta esses arquivos na memoria e faz a inclusão deles no banco de dados principal.

No meu caso tenho um arquivo compactado chamado de municipios.gz, você pode colocar esses arquivos dentro da pasta ‘res’ do seu  projeto aconselho criar uma sub-pasta chamada ‘raw’ e deixar esses arquivos lá.

Importante: Não sei porque mas a SDK do android acusa o arquivo ‘.gz’ como inexistente  nesse caso é só você salvar o arquivo sem a extensão .gz depois de copiar para a pasta renomeie o mesmo no eclipse e tire a extensão. Fique tranquilo que de alguma forma a SDK sabe que ele é um .gz e vai descompacta-lo normalmente.

erro ao tentar acessar um arquivo com a extensão .gz na pasta res/raw

file 02-27 00:53:38.809: E/AndroidRuntime(399): Caused by: android.content.res.Resources$NotFoundException: File res/raw/municipios.gz from drawable resource ID #0x7f040001


1
2
3
4
5
6
7
8
9
10
11
12
13
14
15
16
public JSONArray loadFile() throws IOException, JSONException {
		// pegando o arquivo gz da pasta res/raw e descompactando
		InputStream json = new GZIPInputStream(
				getHelper().getContext().getResources().openRawResource(R.raw.municipios));
 
		// lendo o arquivo json e retornando um array
		StringBuilder builder = new StringBuilder();
		BufferedReader reader = new BufferedReader(
				new InputStreamReader(json));
		String line;
		while ((line = reader.readLine()) != null) {
			builder.append(line);
		}
 
		return new JSONArray(builder.toString());
	}

public JSONArray loadFile() throws IOException, JSONException { // pegando o arquivo gz da pasta res/raw e descompactando InputStream json = new GZIPInputStream( getHelper().getContext().getResources().openRawResource(R.raw.municipios)); // lendo o arquivo json e retornando um array StringBuilder builder = new StringBuilder(); BufferedReader reader = new BufferedReader( new InputStreamReader(json)); String line; while ((line = reader.readLine()) != null) { builder.append(line); } return new JSONArray(builder.toString()); }


Nesse caso acima o arquivo que estava dentro do .gz era um json então precisava de retornar para a models um array em json, mas o importante para descompactar o arquivo é a linha:

1
InputStream json = new GZIPInputStream(getHelper().getContext().getResources().openRawResource(R.raw.municipios));

InputStream json = new GZIPInputStream(getHelper().getContext().getResources().openRawResource(R.raw.municipios));

Tive que colocar o getHelper e getContext pois o método de loadFile estava dentro da minha DAO, se você estiver usando o método GZIPInputStream de dentro de uma activity faça apenas:

1
InputStream json = new GZIPInputStream(getResources().openRawResource(R.raw.municipios));

InputStream json = new GZIPInputStream(getResources().openRawResource(R.raw.municipios));

Nas linhas abaixo eu leio o arquivo json e salvo em uma StringBuilder para transforma-lo em um array, no caso acima ele descompacta o arquivo .gz e abre o arquivo json tudo dentro da memória do dispositivo.

Posted in: Diversos Tagged: android, sdk

Mascara de CEP BR para campos EditText do Android

20 de November de 2011 by oraculum Leave a Comment

Bem se você quiser mais informações sobre como implementar essas mascaras pegue nesse primeiro artigo que escrevi sobre como criar a mascara de Telefone neste post.

Aqui vou postar só o código:

Posted in: Diversos Tagged: android, cep, edittext, mascara

Mascara de Telefone BR para campos EditText no Android

28 de August de 2011 by oraculum 16 Comments
droid

*EDIT* Foi adicionado no arquivo o nono digito para São Paulo

Veja como fazer essa mascara (##) ####-##### no seu EditText

Primeiro adicione uma classe no seu package com o nome de PhoneEditText e coloque o código abaixo:

classe phoneedit

classe phoneedit

Posted in: Diversos Tagged: android, edittext, mascara, sdk

Android: Spinner em runtime

27 de August de 2011 by oraculum 1 Comment

Veja como trabalhar com Spinner do Android, vou mostrar como atribuir uma lista de string ao spinner e como setar o valor default para ele.

XML:

1
<Spinner android:layout_height="wrap_content" android:layout_width="match_parent" android:id="@+id/spEstado"></Spinner>

<Spinner android:layout_height="wrap_content" android:layout_width="match_parent" android:id="@+id/spEstado"></Spinner>

ACTIVITY:

1
2
3
4
5
6
7
8
9
10
11
12
13
14
15
16
17
18
19
20
21
22
23
24
package lethus.social.droid;
 
import android.app.Activity;
import android.os.Bundle;
import android.widget.*;
import android.view.View;
import android.view.View.OnClickListener;
 
 
public class AddFamiliaActivity extends Activity {
	/** Called when the activity is first created. */
 
	@Override
    public void onCreate(Bundle savedInstanceState) {
        super.onCreate(savedInstanceState);
        setContentView(R.layout.add_familia);
        ArrayAdapter<String> adapter = new ArrayAdapter<String>(this,
        		android.R.layout.simple_spinner_item, Tools.getEstados()); // aqui criamos um array adapter que irá popular o spinner o Tools.getEstados() eu explico logo abaixo que eh a variavel de strings que vai ser populada no spinner
        Spinner spEstado = (Spinner)findViewById(R.id.spEstado); //localizo o spinner na view
        spEstado.setAdapter(adapter); // associo o adapter
        spEstado.setSelection(18); // aqui você pode sertar um valor padrão para o spinner
	}
 
}

package lethus.social.droid; import android.app.Activity; import android.os.Bundle; import android.widget.*; import android.view.View; import android.view.View.OnClickListener; public class AddFamiliaActivity extends Activity { /** Called when the activity is first created. */ @Override public void onCreate(Bundle savedInstanceState) { super.onCreate(savedInstanceState); setContentView(R.layout.add_familia); ArrayAdapter<String> adapter = new ArrayAdapter<String>(this, android.R.layout.simple_spinner_item, Tools.getEstados()); // aqui criamos um array adapter que irá popular o spinner o Tools.getEstados() eu explico logo abaixo que eh a variavel de strings que vai ser populada no spinner Spinner spEstado = (Spinner)findViewById(R.id.spEstado); //localizo o spinner na view spEstado.setAdapter(adapter); // associo o adapter spEstado.setSelection(18); // aqui você pode sertar um valor padrão para o spinner } }

Fiz uma classe para retornar todos os estados brasileiros se quiser aproveitar pode usá-la:

CLASSE TOOLS:

1
2
3
4
5
6
7
8
9
10
11
package lethus.social.droid;
 
public class Tools {
	public static String[] getEstados(){
		String[] arr = new String[] {
				"AC", "AL", "AP", "AM", "BA", "CE", "DF", "ES", "GO", "MA", "MT", "MS", "MG", "PA", "PB", "PR", "PE", "PI", "RJ", "RN", "RS", "RO", "RR", "SC", "SP", "SE", "TO" 
		};
 
		return arr;
	}
}

package lethus.social.droid; public class Tools { public static String[] getEstados(){ String[] arr = new String[] { "AC", "AL", "AP", "AM", "BA", "CE", "DF", "ES", "GO", "MA", "MT", "MS", "MG", "PA", "PB", "PR", "PE", "PI", "RJ", "RN", "RS", "RO", "RR", "SC", "SP", "SE", "TO" }; return arr; } }

Posted in: Diversos Tagged: android

Categorias

  • Aplicativos (51)
  • Celular (17)
  • Diversos (95)
  • Filmes (13)
  • Games (16)
  • Livros (2)
  • Musica (7)
  • Noticias (14)
  • Seriados (5)
  • Tecnologia (64)
  • Wallpaper (39)

arquivo

  • May 2016 (1)
  • March 2016 (1)
  • May 2015 (1)
  • April 2015 (2)
  • November 2014 (1)
  • October 2014 (3)
  • September 2014 (1)
  • August 2014 (13)
  • July 2014 (15)
  • June 2014 (16)
  • May 2014 (6)
  • April 2014 (10)
  • March 2014 (1)
  • February 2014 (1)
  • January 2014 (1)
  • November 2013 (5)
  • October 2013 (4)
  • September 2013 (1)
  • August 2013 (3)
  • July 2013 (1)
  • June 2013 (1)
  • May 2013 (2)
  • April 2013 (1)
  • December 2012 (3)
  • November 2012 (1)
  • October 2012 (4)
  • August 2012 (1)
  • July 2012 (3)
  • June 2012 (2)
  • April 2012 (6)
  • February 2012 (3)
  • January 2012 (2)
  • November 2011 (3)
  • October 2011 (3)
  • September 2011 (1)
  • August 2011 (5)
  • July 2011 (1)
  • June 2011 (3)
  • May 2011 (7)
  • April 2011 (6)
  • March 2011 (13)
  • February 2011 (3)
  • January 2011 (26)
  • December 2010 (13)
  • November 2010 (2)
  • August 2010 (5)
  • July 2010 (3)
  • June 2010 (4)
  • May 2010 (2)
  • March 2010 (16)
  • February 2010 (5)
  • December 2009 (2)
  • November 2009 (1)
  • October 2009 (2)
  • September 2009 (3)
  • August 2009 (8)
  • July 2009 (10)
  • June 2009 (7)
  • May 2009 (10)
  • April 2009 (6)
  • March 2009 (6)

Copyright © 2023 Oraculum Blog.

Omega WordPress Theme by ThemeHall